Workshop Prerequisites
BioEngineeR 2026 | Data Analysis with R
Overview
Welcome to BioEngineeR 2026! The next steps will guide you through the software installation and self-paced learning required before the workshop. Please complete these prerequisites before the workshop begins.
3-4 hours (including installation and self-paced learning)
1. Software Installation
1.1 Install R
R is a free, open-source programming language for statistical computing and graphics.
- Visit CRAN R Project
- Click “Download R-4.x.x for Windows” (latest version)
- Run the downloaded
.exefile - Follow the installation wizard (accept all defaults)
- Click Finish when complete
- Optional Step (Recommended): Install RTools (http://cran.r-project.org/bin/windows/Rtools/)
- Visit CRAN R Project for macOS
- Download the appropriate version:
- Apple Silicon (M1/M2/M3):
R-4.x.x-arm64.pkg - Intel Mac:
R-4.x.x-x86_64.pkg
- Apple Silicon (M1/M2/M3):
- Open the downloaded
.pkgfile - Follow the installation prompts
- Move R to your Applications folder
- Optional Step (Recommended): Install RTools (https://mac.r-project.org/tools/)
1.2 Install RStudio
RStudio is an integrated development environment (IDE) that makes working with R much easier.
- Visit Posit Downloads
- Scroll to “RStudio Desktop” section
- Choose Operating System
- Click “Download RStudio”
- Run the downloaded
.exe/.dmgfile - Follow installation wizard (Windows)/ Drag RStudio to your Applications folder (Mac)
1.3 Verify Installation
- Open RStudio (not R)
- In the Console pane (bottom-left), type:
R.version.string- You should see output like:
"R version 4.5.x (202x-xx-xx)"
If you encounter installation issues, consult you can email me at dr.arunmitra@gmail.com
2. RStudio Interface Overview
RStudio is an integrated development environment (IDE) designed to help you be more productive in your daily data science work.
After you have installed R and RStudio, you are ready to begin this section!
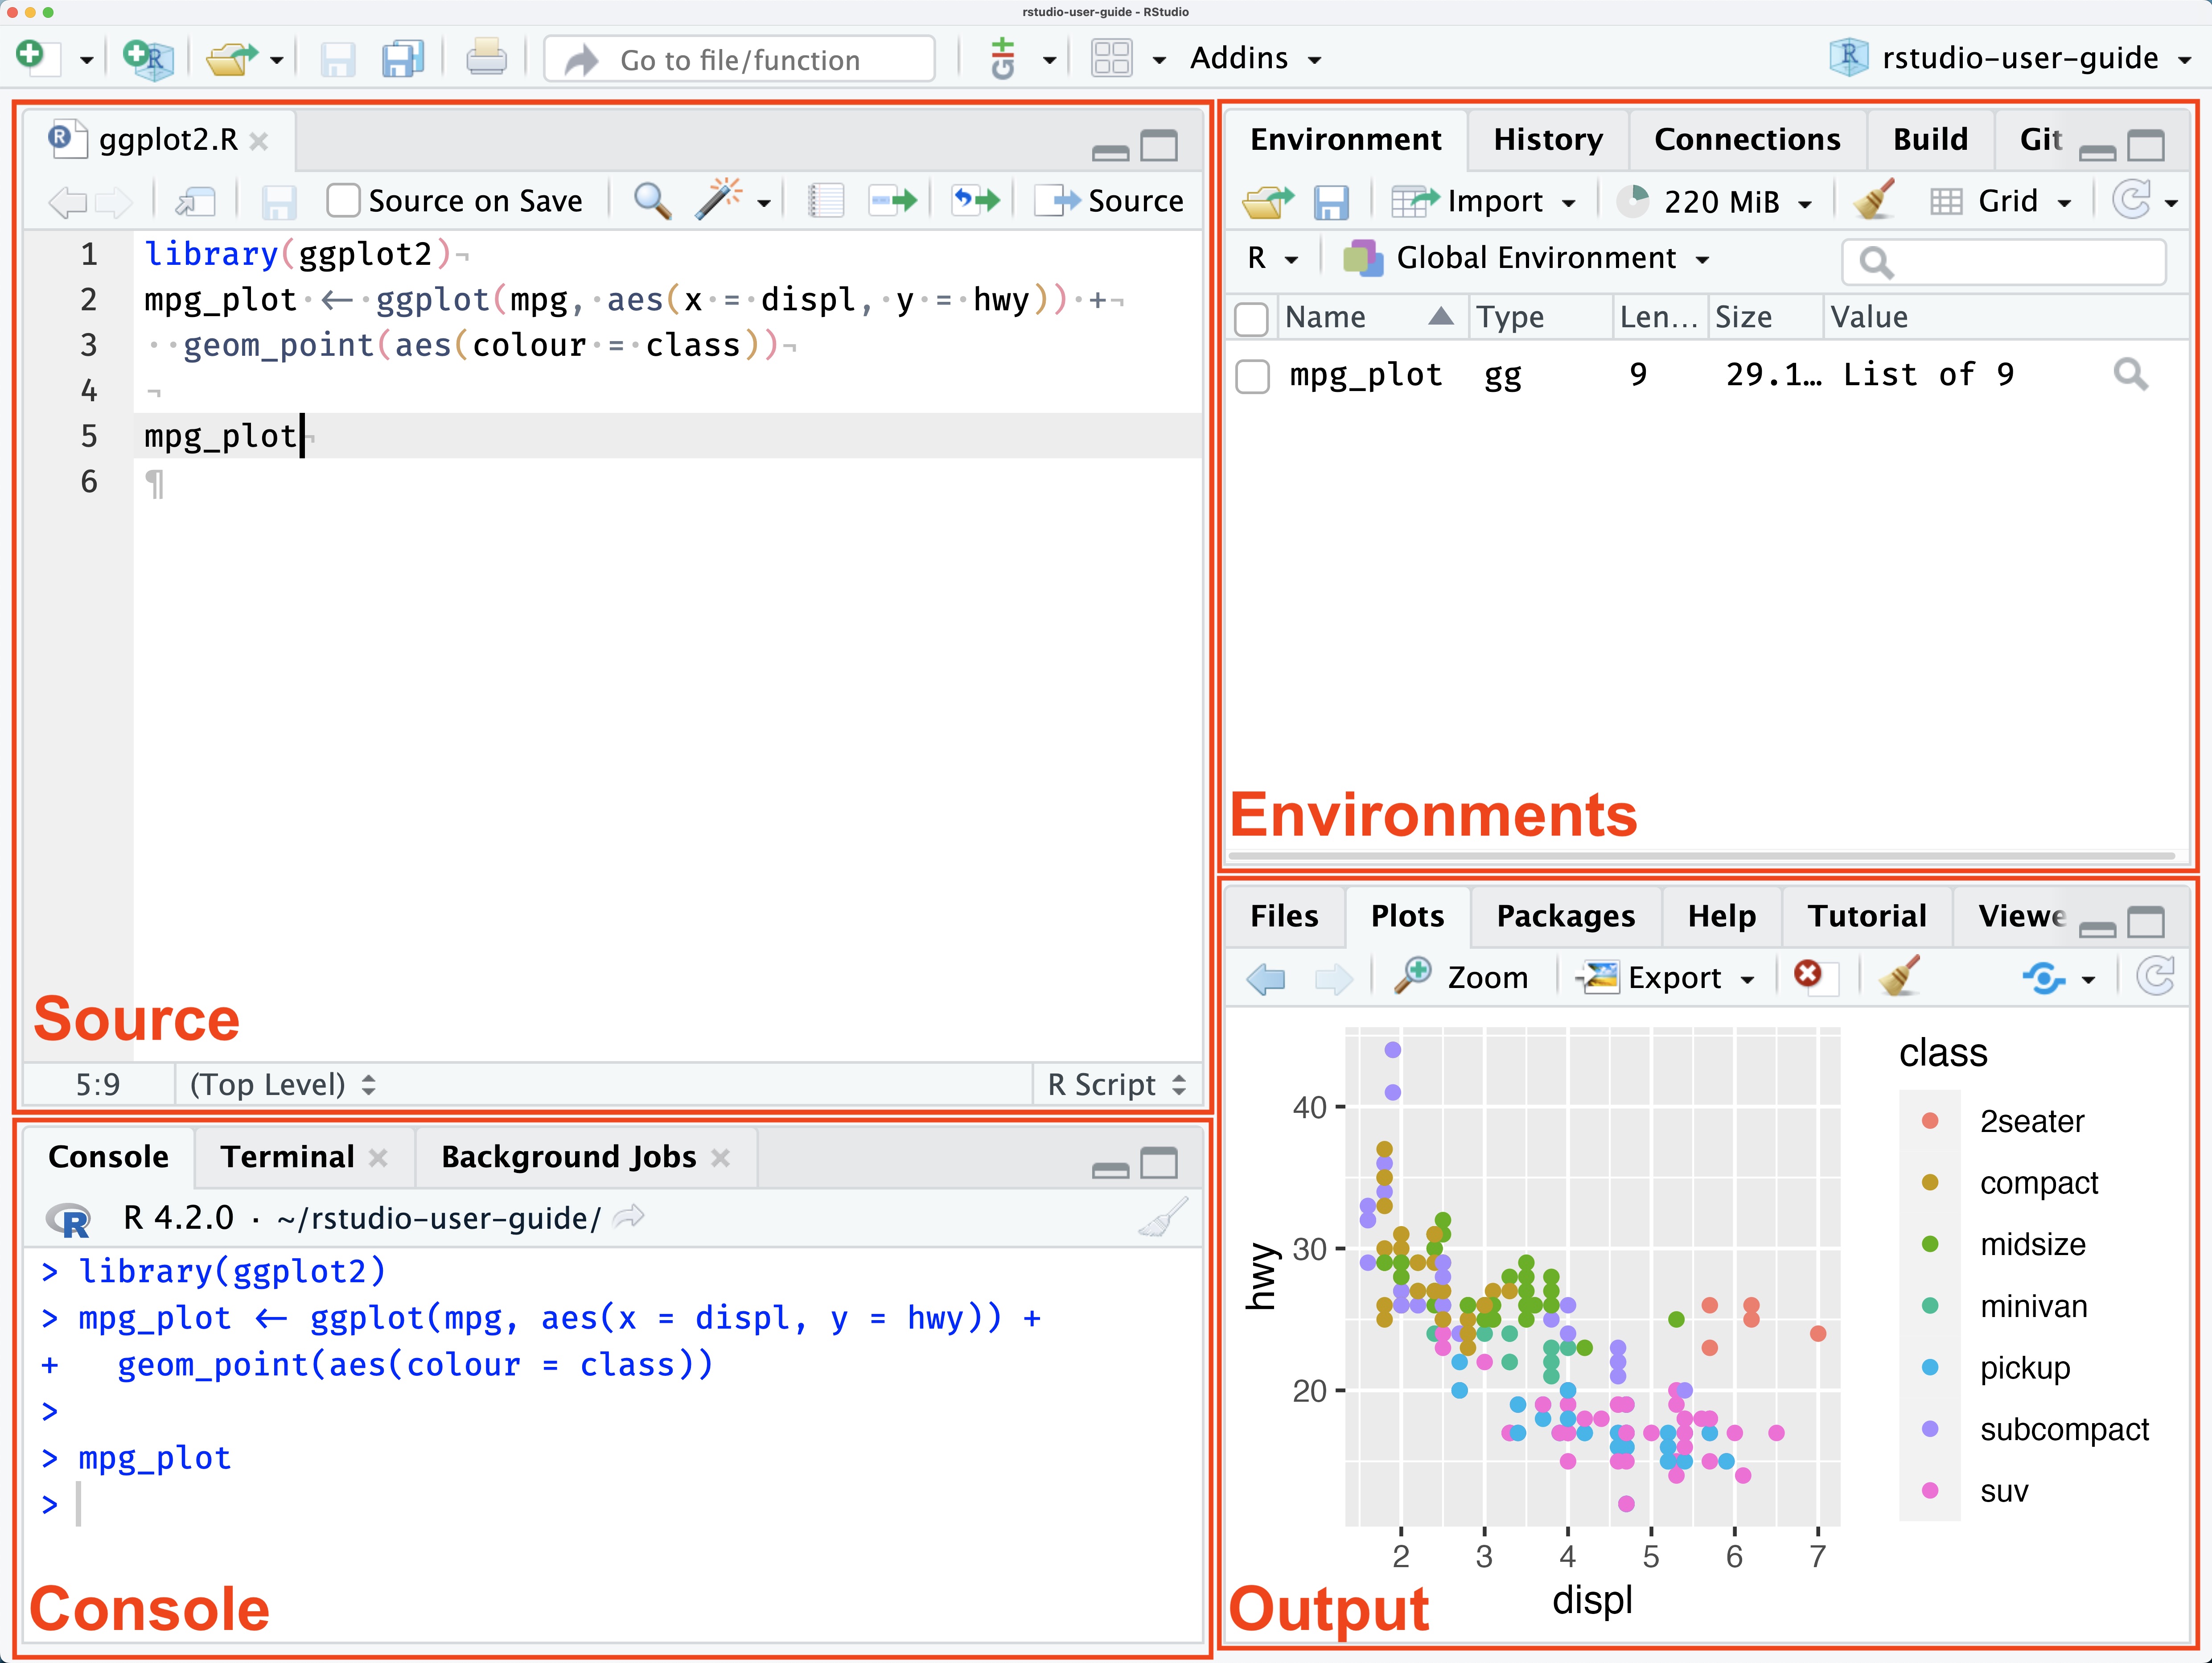
When you start RStudio, you’ll see four key regions or “panes” in the interface: the Source pane, the Console pane, the Environment pane and the Output Pane.
RStudio Panes
The Source pane is where you can edit and save R or Python scripts or author computational documents like Quarto and R Markdown.
The Console pane is used to write short interactive R commands.
The Environment pane displays temporary R objects as created during that R session.
The Output pane displays the plots, tables, or HTML outputs of executed code along with files saved to disk.
Blank slate
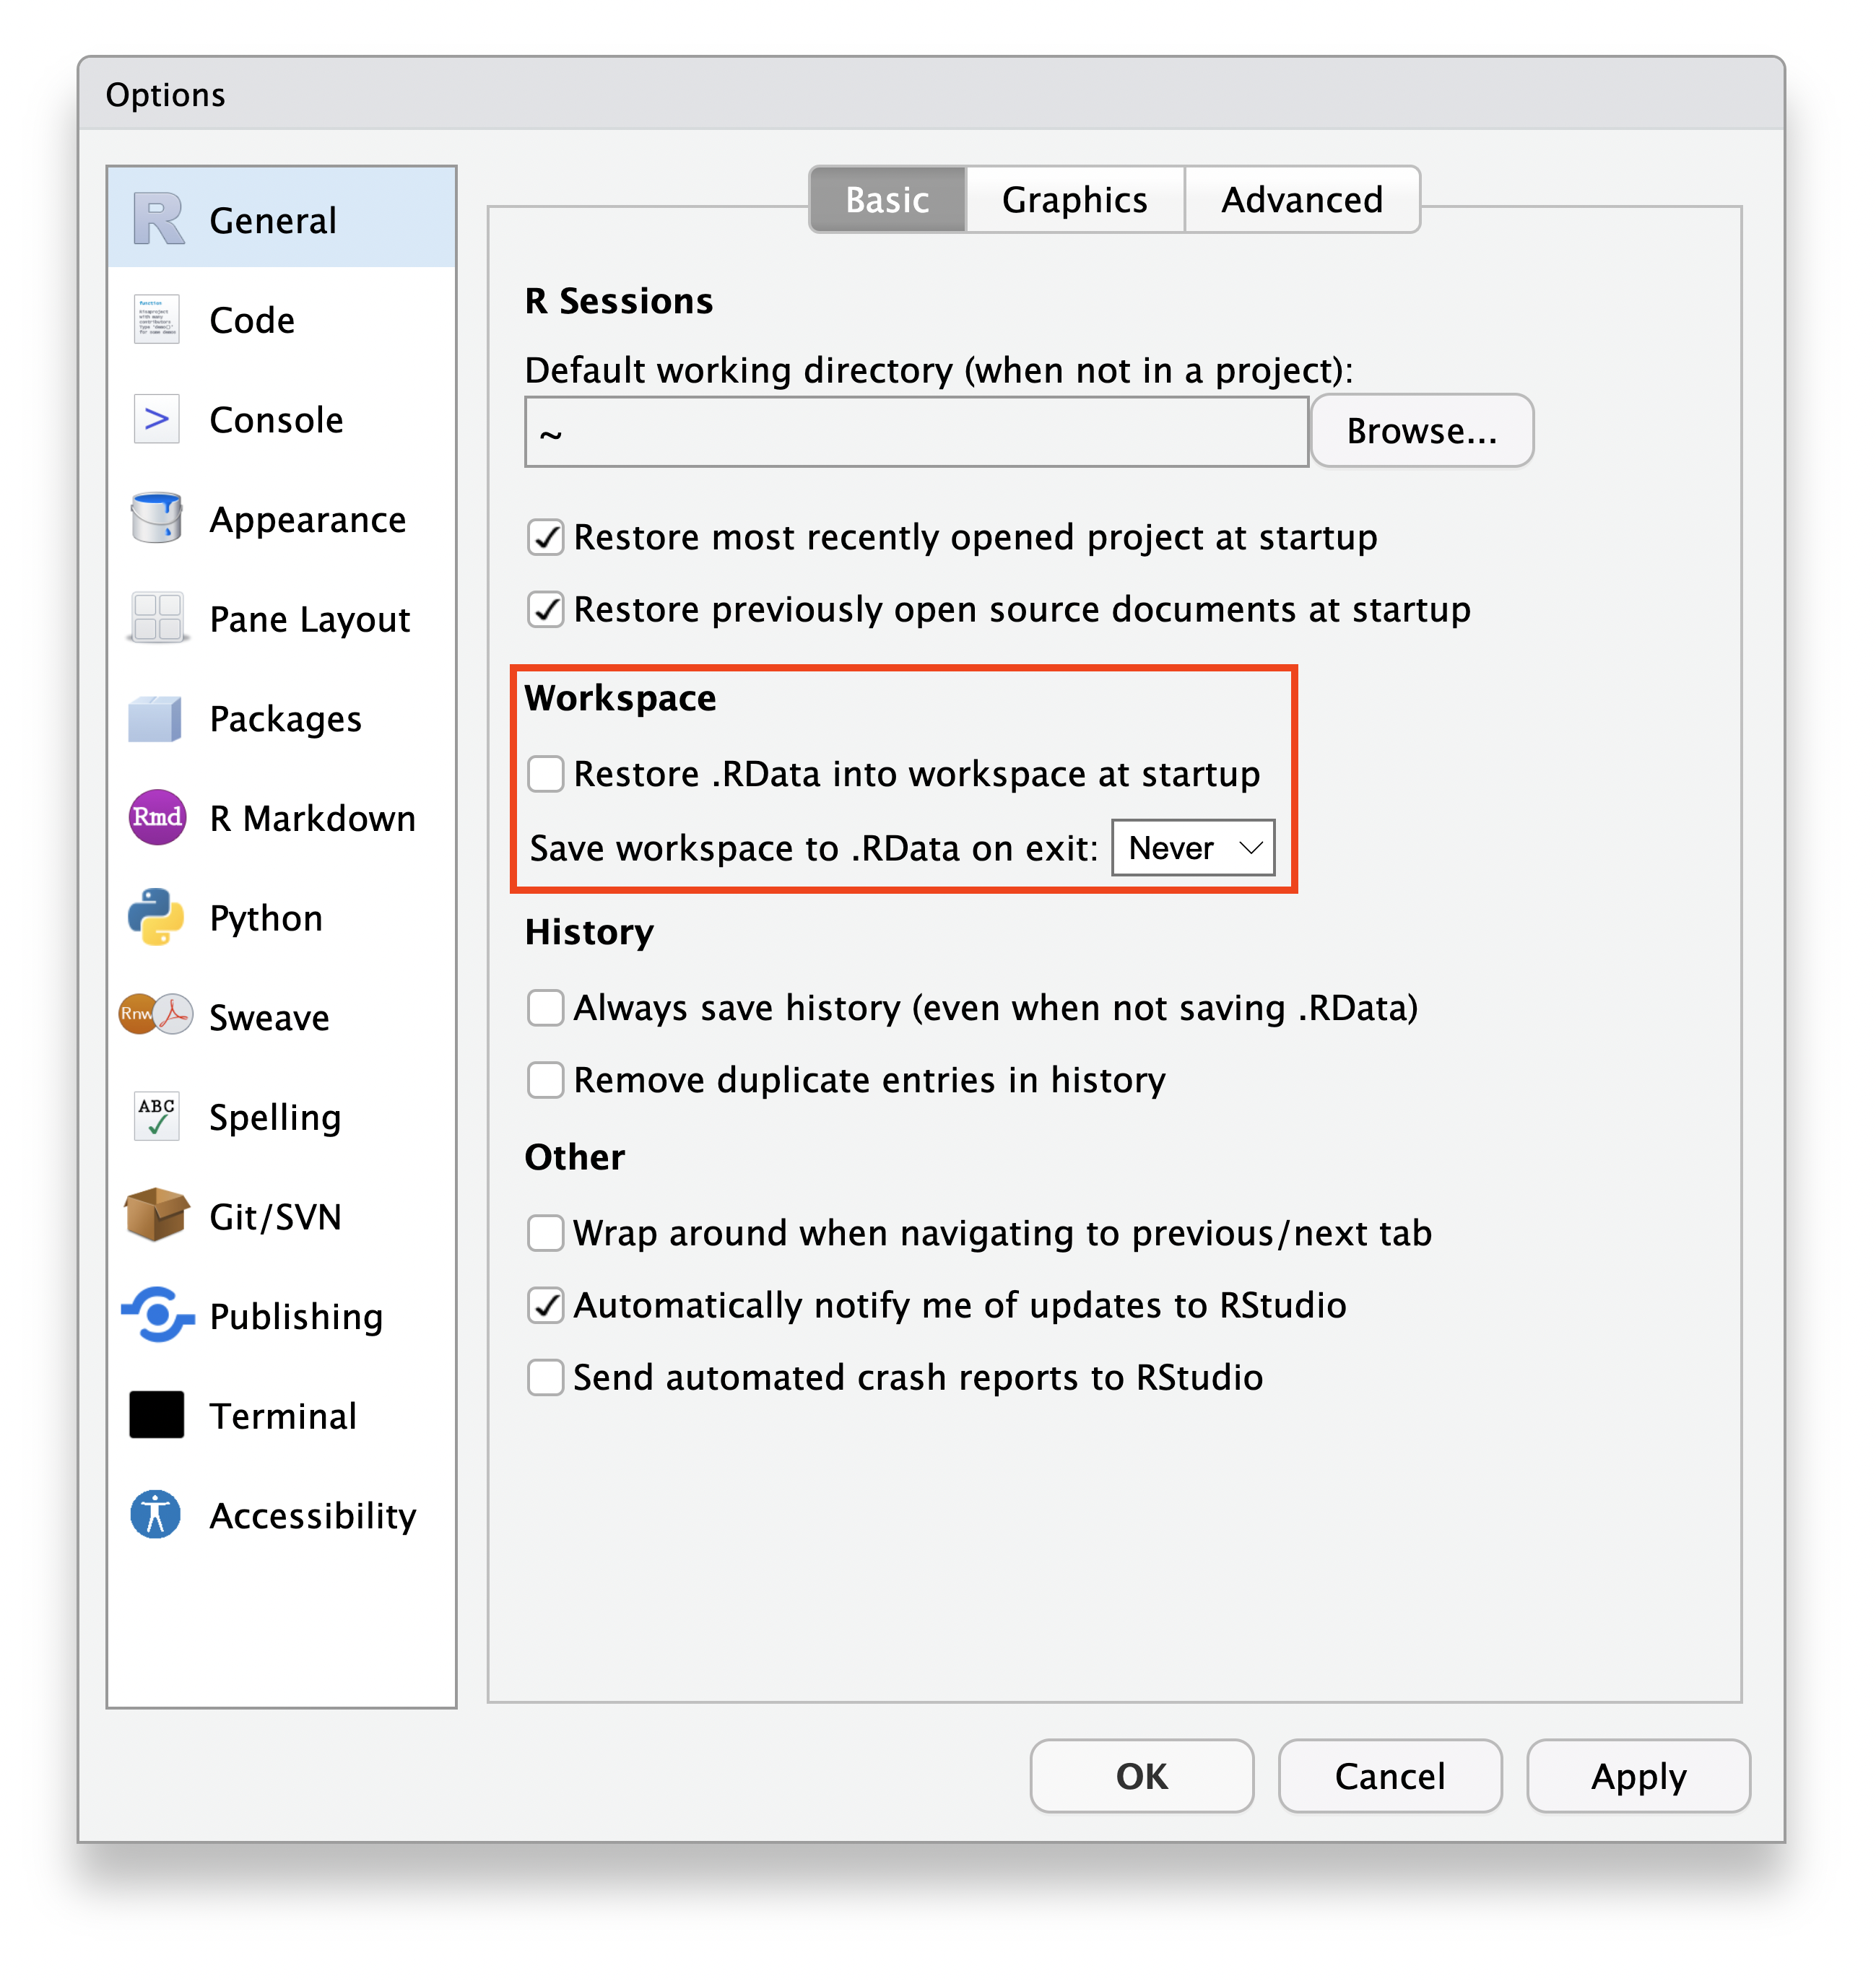
When you quit R, do not save the workspace to an .Rdata file. When you launch, do not reload the workspace from an .Rdata file. Long-term reproducibility is enhanced when you turn this feature off and clear R’s memory at every restart. Starting with a blank slate provides timely feedback that encourages the development of scripts that are complete and self-contained.
In RStudio, set this via Tools > Global Options, making sure to clear “Restore .RData into Workspace at Startup” and choosing Never on the “Save workspace to .RData on exit”.
RStudio Projects
RStudio projects make it straightforward to divide your work into multiple contexts, each with their own working directory, workspace, history, and source documents.
To create a new project in the RStudio, use the File > New Project command.
In the New Project wizard that pops up, select New Directory, then New Project. Name the project “hello-ggplot2” and then click the Create Project button.
This will launch you into a new RStudio Project inside a new folder called “hello-ggplot2”.
RStudio projects give you a solid workflow that will serve you well in the future:
Create an RStudio project for each data analysis project.
Keep data files there; we’ll talk about loading them into R in Local Data.
Keep scripts there; edit them, run them in bits or as a whole.
Save your outputs (plots and cleaned data) there.
Everything you need is in one place, and cleanly separated from all the other projects that you are working on.
Before the workshop, familiarize yourself with RStudio’s four main panes:
| Pane | Location | Purpose |
|---|---|---|
| Source | Top-left | Write and edit R scripts |
| Console | Bottom-left | Run R commands interactively |
| Environment | Top-right | View loaded data and objects |
| Files/Plots/Help | Bottom-right | Navigate files, view plots, access documentation |
Recommended Video (10 min)
Watch this brief orientation: A Quick Tour of RStudio by Posit (formerly RStudio)
3. R Programming Basics
Complete the following self-paced learning (~2 hours) to build foundational skills.
Core Concepts to Learn
Before the workshop, ensure you understand:
Step 1: Programming Basics Practice R directly in your browser — no installation needed: https://r-primers.andrewheiss.com/basics/02-programming-basics/
Step 2: Workflow Basics Read this chapter from R for Data Science (2e): https://r4ds.hadley.nz/workflow-basics.html
Video Tutorials (Optional but Recommended)
dplyr (Data Wrangling)
ggplot2 (Visualization)
Download Cheatsheets
Keep these handy during the workshop:
- Data Transformation
dplyr: https://rstudio.github.io/cheatsheets/data-transformation.pdf - Data Visualization
ggplot2: https://rstudio.github.io/cheatsheets/data-visualization.pdf - All cheatsheets: https://posit.co/resources/cheatsheets/
Pre-Workshop Checklist
Before the workshop, please confirm: • [ ] R installed (version 4.5+) • [ ] RStudio installed and working • [ ] Completed Programming Basics primer • [ ] Read Workflow Basics chapter • [ ] Watched the video tutorials • [ ] Downloaded Cheatsheets
If you encounter any installation issues, please reach out to at dr.arunmitra@gmail.com
Contact
Shayna,
Department of Bioengineering, IISc Bangalore.
+91 9611564411